Command Line
- 列出目录下的所有文件夹的及文件,规整
- ls -laR /etc/X11/
- 查看安装的驱动
- inxi -G
- 查看各文件大小
- du [-abcDhHklmsSx] [-L <符号连接>][-X <文件>][--block-size][--exclude=<目录或文件>] [--max-depth=<目录层数>][--help][--version][目录或文件]
- eg. sudo du -h --max-depth=1
- smb://ganglion/disk1
Docker
https://wiki.archlinux.org/index.php/Docker_(%E7%AE%80%E4%BD%93%E4%B8%AD%E6%96%87)
https://zhuanlan.zhihu.com/p/65696014
https://blog.csdn.net/github_36749622/article/details/83094601
Colab
https://medium.com/deep-learning-turkey/google-colab-free-gpu-tutorial-e113627b9f5d
https://juejin.im/post/5c05e1bc518825689f1b4948
设置GPU
授权和切换工作路径
1 | !apt-get install -y -qq software-properties-common python-software-properties module-init-tools |
1 | import os |
- 安装anaconda环境,配置conda env
1
https://facebookresearch.github.io/TensorComprehensions/installation_colab_research.html
Vim
. sp / vs 分屏
sp / vs 后
检索打开的文件 垂直方向分屏: sp
水平方向分屏:vs
. ls / b 阅览与打开历史打开文件
打开最近打开列表::ls
打开对应编号的文件:b
. 空格折叠
- .vimrc: nnoremap
za - Plugin 'tmhedberg/SimpylFold'(未安装成功)
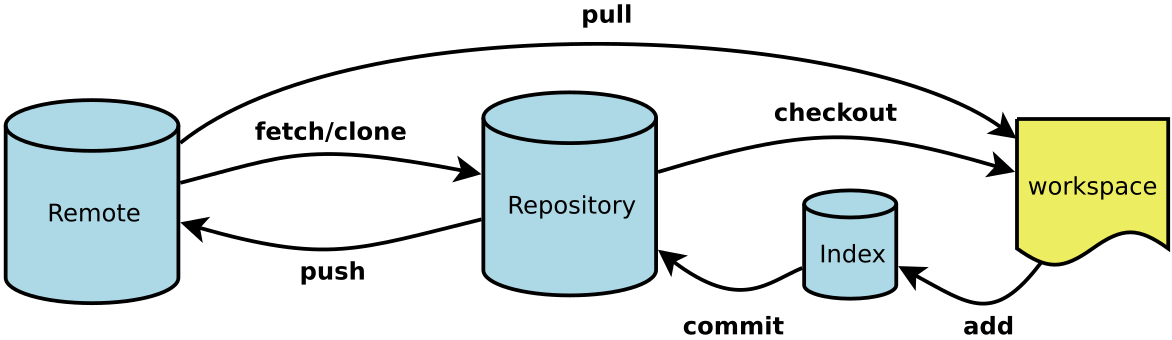
Git
http://www.ruanyifeng.com/blog/2015/12/git-cheat-sheet.html
新建代码库
1 | # 在当前目录新建一个Git代码库 |
配置
Git的设置文件为.gitconfig,它可以在用户主目录下(全局配置),也可以在项目目录下(项目配置)。
1 | # 显示当前的Git配置 |
增加/删除文件
1 | # 添加指定文件到暂存区 |
代码提交
1 | # 提交暂存区到仓库区 |
分支
1 | # 列出所有本地分支 |
标签
1 | # 列出所有tag |
查看信息
1 | # 显示有变更的文件 |
远程同步
1 | # 下载远程仓库的所有变动 |
撤销
1 | # 恢复暂存区的指定文件到工作区 |
其他
1 | # 生成一个可供发布的压缩包 |
pacman
sudo pacman-mirrors --fasttrack && sudo pacman -Syyu
pacman -S package_name # 安装软件 pacman -S extra/package_name # 安装不同仓库中的版本 pacman -Syu # 升级整个系统,y是更新数据库,yy是强制更新,u是升级软件 pacman -Ss string # 在包数据库中查询软件 pacman -Si package_name # 显示软件的详细信息 pacman -Sc # 清除软件缓存,即/var/cache/pacman/pkg目录下的文件 pacman -R package_name # 删除单个软件 pacman -Rs package_name # 删除指定软件及其没有被其他已安装软件使用的依赖关系 pacman -Qs string # 查询已安装的软件包 pacman -Qi package_name # 查询本地安装包的详细信息 pacman -Ql package_name # 获取已安装软件所包含的文件的列表 pacman -U package.tar.zx # 从本地文件安装 pactree package_name # 显示软件的依赖树
列出已经安装的软件包👇
pacman -Q 查看virtualbox包是否已经安装👇
pacman -Q virtualbox 查看已安装的包virtualbox的详细信息👇
pacman -Qi virtualbox 列出已安装包virtualbox的所有文件👇
pacman -Ql virtualbox 查找某个文件属于哪个包👇
pacman -Qo /etc/passwd 查询包组👇
pacman -Sg 查询包组所包含的软件包👇
pacman -Sg gnome 搜索virtualbox相关的包👇
pacman -Ss virtualbox 从数据库中搜索virtualbox的信息👇
pacman -Si virtualbox 仅同步源👇
sudo pacman -Sy 更新系统👇
sudo pacman -Su 同步源并更新系统👇
sudo pacman -Syu 同步源后安装包👇
sudo pacman -Sy virtualbox 从本地数据库中获取virtualbox的信息,并下载安装👇
sudo pacman -S virtualbox 强制安装virtualbox包👇
sudo pacman -Sf virtualbox 删除virtualbox👇
sudo pacman -R virtualbox 强制删除被依赖的包(慎用)👇
sudo pacman -Rd virtualbox 删除virtualbox包及依赖其的包👇
sudo pacman -Rc virtualbox 删除virtualbox包及其依赖的包👇
sudo pacman -Rsc virtualbox 清理/var/cache/pacman/pkg目录下的旧包👇
sudo pacman -Sc 清除所有下载的包和数据库👇
sudo pacman -Scc 安装下载的virtualbox包(有时候需要降级包的时候就用这个)👇
cd /var/cache/pacman/pkg
sudo pacman -U virtualbox-5.2.12-1-x86_64.pkg.tar.xz 升级时不升级virtualbox包👇
sudo pacman -Su --ignore virtualbox 详细请转向:https://wiki.archlinux.org/index.php/Pacman_(简体中文)
conda
0.获取版本号 conda --version
或
conda -V
1.获取帮助 conda --help conda -h 查看某一命令的帮助,如update命令及remove命令 conda update --help conda remove --help 同理,以上命令中的--help也可以换成-h。
2.环境管理 查看环境管理的全部命令帮助 conda env -h
创建环境 conda create --name your_env_name 输入y确认创建。
创建制定python版本的环境 conda create --name your_env_name python=2.7 conda create --name your_env_name python=3 conda create --name your_env_name python=3.5
创建包含某些包的环境 conda create --name your_env_name numpy scipy
创建指定python版本下包含某些包的环境 conda create --name your_env_name python=3.5 numpy scipy
列举当前所有环境 conda info --envs conda env list
进入某个环境 activate your_env_name
退出当前环境 deactivate
复制某个环境 conda create --name new_env_name --clone old_env_name
删除某个环境 conda remove --name your_env_name --all
4.包管理 列举当前活跃环境下的所有包 conda list
列举一个非当前活跃环境下的所有包 conda list -n your_env_name
为指定环境安装某个包 conda install -n env_name package_name
如果不能通过conda install来安装,文档中提到可以从Anaconda.org安装,但我觉得会更习惯用pip直接安装。pip在Anaconda中已安装好,不需要单独为每个环境安装pip。如需要用pip管理包,activate环境后直接使用即可。
5.清理包
conda clean --all
Reboot
.i3/config
~/.zshrc
~/command.md
/etc/fstab
~/.vimrc
ganglion 挂载
smb://ganglion/disk1
For Nvidia-GPU
https://blog.csdn.net/qq_39828850/article/details/87919188